rss

Woodinville Age Your Own Whiskey Kit

Sunday, April 15, 2012


For Christmas I got the Woodinville Age Your Own Whiskey Kit. You can find it on their website. The kit came with a oak barrel, a little instruction booklet, and two bottles of white dog whiskey. For those of you who may not know, white dog whiskey is whiskey that has been un-aged so it is clear in color. Because this is such a small oak barrel, the aging process is accelerated. So normally a whiskey that is aged a couple years could be aged in a couple of months.
Here is the whiskey at 4 weeks. It was more mature, but needs to be smoother.
At 5 weeks it had gotten some of it's smoothness. At week 8, which I neglected to photograph, it could have been bottled. But,  I was curious what waiting the full three months would do. 
Week 12 and the whiskey was nice and smooth. I'm definitely glad I waited. Time to bottle!
I used a tea ball to catch any debris that might have been in the barrel.  I was surprised that there wasn't any, probably because I did a good shake to get it out before I bottled.
The final bit. I actually got more whiskey out of it than I put in, despite those thirsty angels. This is probably because I added some filtered water to the barrel per the instructions. This whiskey is smooth. I need to order some more white dog whiskey to age another batch. According to the literature the kit came with, I should be able to get a few rounds of aging out of the barrel. After that, it's going to make a really neat book case decoration.


Strawberry Brown Butter Bettys

Thursday, May 27, 2010


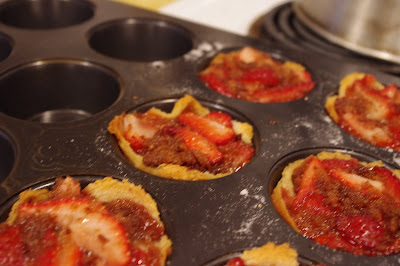
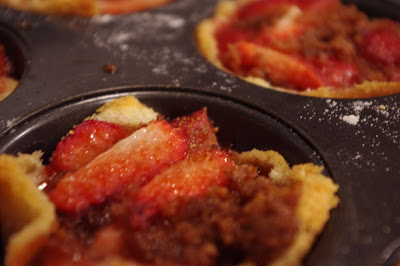
Thanks to Katy for sending me this recipe from the blog Smitten Kitchen. These Strawberry Brown Butter Bettys were easy to make and came out super yummy! The only variations I made in the recipe below was omitting the lemon zest (because I forgot to get a lemon at the store) and using canned whipped cream (because I'm lazy.) Also, when making the panko I used my room mate's slap-chop like device and it worked out well. I will be making these Bettys again!


Strawberry Brown Butter Bettys
Adapted generously from Gourmet
Makes 6 muffin-sized desserts
3/4 stick salted or unsalted butter
1 teaspoon granulated sugar
6 slices white sandwich bread, crusts removed
1/4 cup packed dark brown sugar
1/2 teaspoon lemon zest, finely grated
1/8 teaspoon salt (omit if using salted butter)
1/2 cup panko (Japanese bread crumbs, or make your own, below*)
1 1/2 to 2 cups strawberries, stemmed and sliced (I forgot to jot down the weight, but it was less than a half pound of whole berries)
? Softly whipped cream, for serving

Preheat oven to 350°F with rack in middle.
In a small pot, melt butter over medium heat. Once melted, reduce heat to medium-low. The butter will melt, then foam, then turn clear golden and finally start to turn brown and smell nutty. Stir frequently, scraping up any bits from the bottom as you do. Don’t take your eyes off the pot as while you may be impatient for it to start browning, the period between the time the butter begins to take on color and the point where it burns is less than a minute. Remove from heat.

Lightly butter muffin cups with some of brown butter, then sprinkle with granulated sugar. Roll bread slices with a rolling pin to flatten. Brush both sides with additional brown butter, then gently fit into muffin cups.
Stir together brown sugar, zest, salt and panko, then add strawberries and toss to coat. Stir in remaining brown butter. Heap strawberry mixture into cups, pressing gently.

Cover pan with foil and bake 15 minutes. Uncover and bake until strawberries are very tender, about 10 minutes more. Let stand 5 minutes before removing from pan. Serve warm or at room temperature.

* Make your own panko: Sure, it’s not exactly the same thing but I’m convinced that you can make very panko-like crumbs if you do the following — Preheat oven to 350 degrees. Tear one to two slices of soft, crustless white bread into 1-inch pieces and pulse them in the food processor until coarsely ground. This will make a generous half cup. Transfer crumbs to a rimmed baking sheet and bake until golden brown and dry, about 15 minutes, stirring occasionally. Cool. Use.


Filters

Monday, May 24, 2010

I'm loving my new camera! One of the fun things about it is the use of filters directly on the camera itself. The filters themselves have customization so you can make one photo come out hundreds of ways. It's pretty awesome.

Here we have nice photo I took of the Painted Ladies in Alamo Square.

Now we have the same picture but with pastel filter. Pretty spiffy, eh?


Here is the watercolor filter. You might recognize this photo from my Snap. Post. Repeat. blog.


Here we have the HDR filter.


The fisheye filter. I think this would be better on a portrait or macro photograph.


The extract color filter removes all the color from the picture except one of your choosing. Here I kept the color green in the picture.


This is a high contrast filter.


Here is a miniature filter. It blurs part of the image to create a fake miniature scene. I think this filter would work better on a different type of picture, like a cityscape one.


The retro filter is fun. You can change the tint to either a blue hue or a brown hue.


The soft filter reminds me of a soap opera.


I didn't think the starburst filter was doing anything when I was looking at the picture on my tiny LCD camera screen but now I see the starburst. I bet this filter would be awesome with a night picture!


The toy camera filter makes the picture look like it was taken with a cheap toy camera that has a plastic lens. I find it funny that the toy camera types of photographs have been so popular because of their distorted artsy look despite the fact that they are (originally) created with, well,  cheap toy cameras.


Here is a water color filter of a photograph of San Francisco from Twin Peaks. It came out really neat!


Here is the extract color filter again. I think this picture looks stunning.


And here's another watercolor filter picture.


I could post more and more, but I think get the idea about how much fun they are. BTW, did I mention that I love my new camera!?

Mother's Day (a little late)

Sunday, May 23, 2010

Due to unforeseen circumstances we had to move our Mother's Day activities two weeks after Mother's Day. But, it was a beautiful day in San Francisco and Mom, Jamie, Alice and Nancy drove down from Napa and enjoyed the day with Dave and I. We started out having tea at The Secret Garden Tea House. After our bellies were full of pastries and tea we took a stroll through The Botanical Gardens followed by a jaunt to Twin Peaks where we took in the view of San Francisco. We ended the beautiful day at Alamo Square Park where the famous Painted Ladies are. It was a gorgeous day and everyone had a great time!

(BTW- The day was also a learning experience with my new Pentax K-x camera. The pictures below get slowly better as the day progresses and I get more accustomed to the camera's settings.)